NPM is a Package Manager for Node JS. It was first created in 2009 as an open-source project to help JavaScript developers to easily share their code in the form of packages. NPM allows you to install the various public packages for the project. NPM has over 8,00,000 packages with public access.
My intention behind writing this blog is to help React-native developers create their own package. If any developer wants to share his own package on the NPM registry, then he needs to make it public. This allows developers to contribute to the NPM ecosystem. Steps to create and publish a react-native NPM package are as follows:
There are 3 phases to create and publish a package.
1. Creating the NPM package.
2. Testing the NPM package on the react-native app.
3. Publishing on the NPM website.
1. Creating the NPM package:
First create a folder where package information like package.json, .babelrc, webpack.config.js, etc will be stored. We will introduce these files soon.
Now navigate into that folder directory using terminal and run command – npm init
You will be prompted for the package name, version, main, keyword, etc. You can skip questions (by pressing enter) (it is easy to modify later). At this point, a package.json file will be created.
Now, open the package.json file in your IDE (code editor) and install all the dependencies as below using – npm install dependency-name.
Below is an example of package.json file.
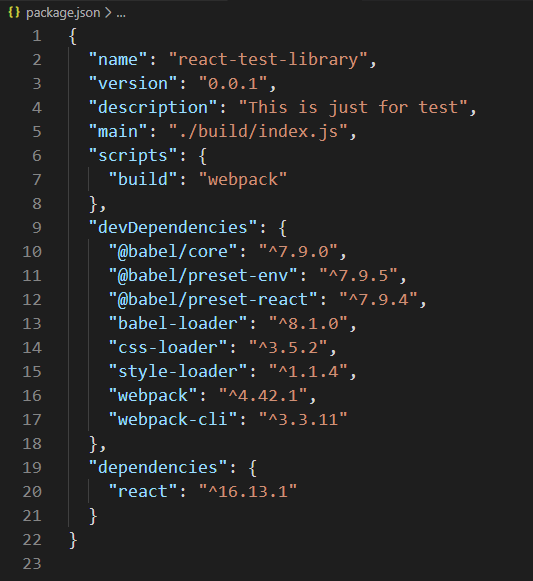
Note: “main” should be the same as above.
Now create a file .babelrc and add the following lines. Babel is a compiler to convert JavaScript code into ES5 JavaScript.

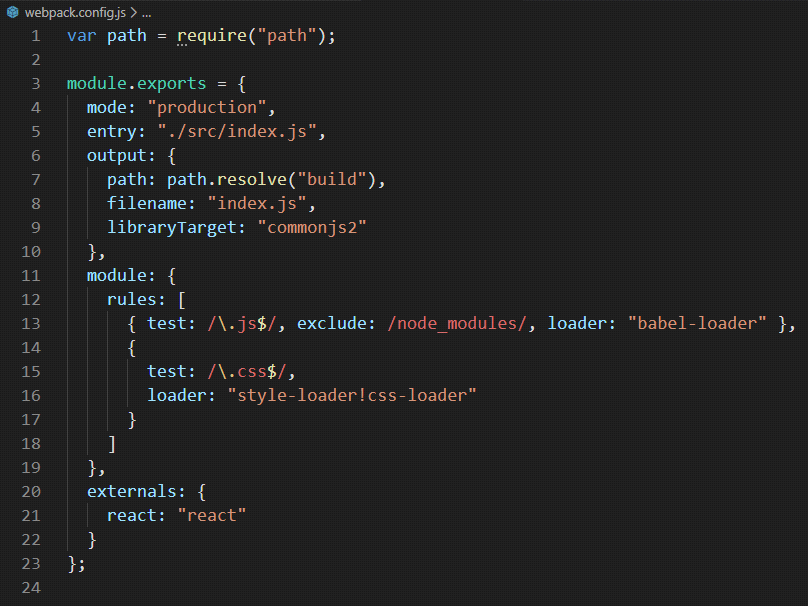
Let’s create a file named webpack.config.js and add the lines below.
Remember, webpack is the builder. It compresses code into ‘build’ that can be deployed in the React-Native app. Make sure “entry” is either ./src/index.js or ./index.js depending upon your file structure.
Now, create a folder src, add the index.js file and add your component.
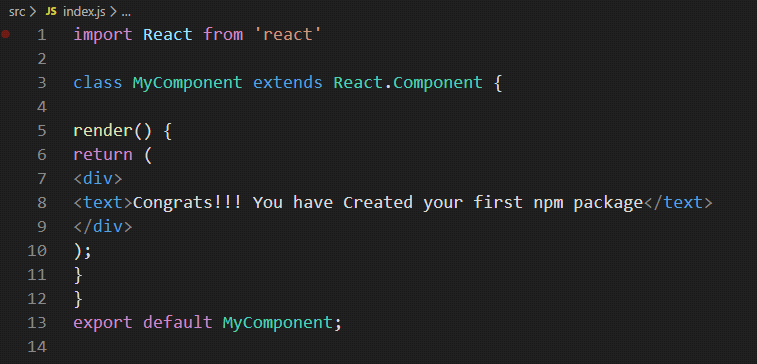
Whenever you make any change to your package, you have to create the build again using command – npm run build. After that, you must re-install it in the react-native app.
Once you configure the above steps, your folder structure should look as follows
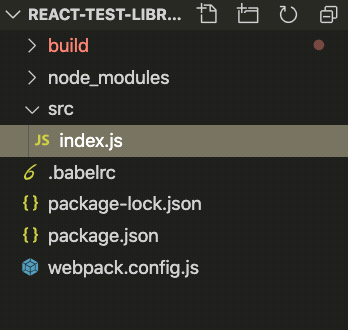
2. Testing the package on React-Native app:
To test or use your package, you will need a React-Native app. Create a React-Native app by executing the run command npm create-react-app “your app name” and open it in your IDE.
You can install your package in two ways
1. Upload it on the NPM website and then install it using npm i “package name”.
2. Locally install it through a relative path of NPM package to react-native app npm i ../react-test-library

Note: We will try to avoid the first option because whenever there is any change in your NPM package, you have to re-publish it on the NPM website and re-install it on your project.
So we will test it locally first and then upload it on the NPM website.
To check your package, you have to install it through the relative path as shown in the above example and import your component from your package.
src/App.js
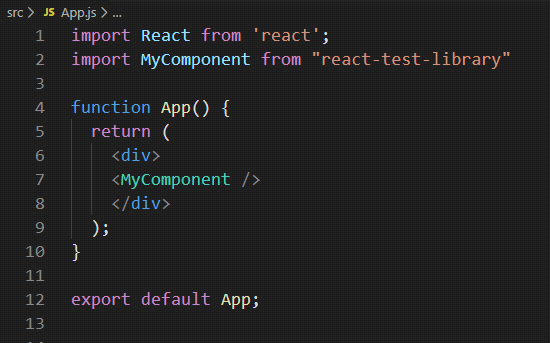
To see the result of the installed package, run the command in your react-native app – npm start.

Now, let’s see the final step.
3. Publishing on the NPM website:
For publishing any package, you should have an account on the NPM website (if not you can create one). While uploading the same package, the package version should be unique each time.
Steps to upload your package –
1. Using the terminal, navigate to your package directory.
2. Run command – npm login. Enter a username, password, and email id.
3. Run command – npm publish.
Once your package has been published, you can check it on the NPM website.

At last, you are able to create your own library. In case of any queries feel free to share your feedback in the comments section below.
Happy Coding…